Quick Start: Connecting a Non-Smart Device to EnOS™ Cloud via Edge
This section helps you to quickly learn how to connect the sub-device and edge to the EnOS Cloud, allowing the sub-device to connect and send telemetry to the EnOS Cloud through the edge, as well as how to check the communication status and view the data from the EnOS Management Console.
About This Scenario
For more information about the connection scenario of this task, see “Scenario 2.1” in Device Registration Methods.
About This Task
In this example, an inverter will be connected to the EnOS Cloud through an edge gateway. The edge gateway will collect data from the inverter and send them to the EnOS Cloud as a proxy. The overall connection scenario is shown in the flowchart below:
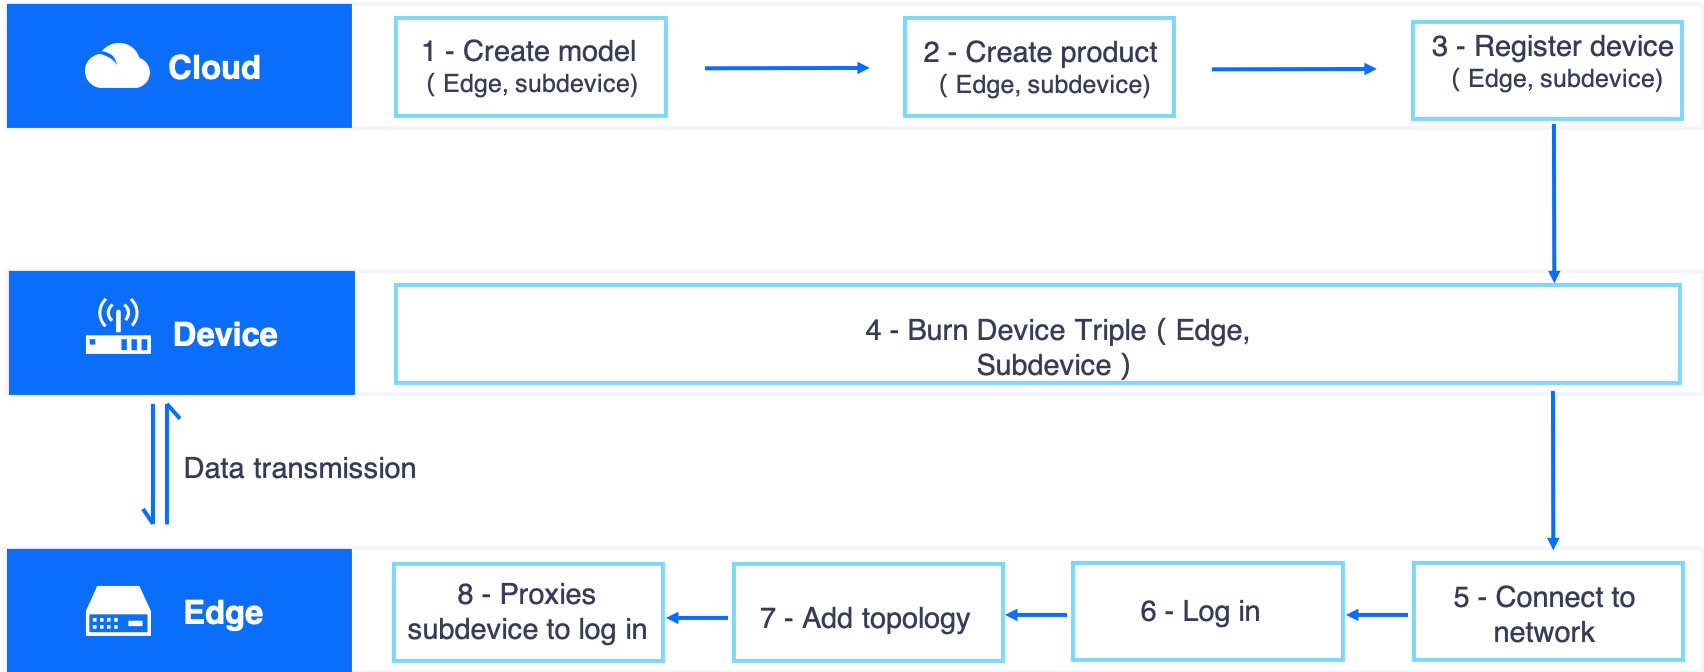
The procedure has the following steps:
- Create device models
- Gateway model
- Inverter Model
- Create products
- Gateway product
- Inverter product
- Register devices
- Gateway device
- Inverter device
- Configure the edge gateway
- Use the device SDK to simulate the sending of data via the gateway as a proxy of the sub-device.
- Check the device communication status.
- Check the device data.
Prerequisites
Before you start, make sure that you have completed the sub-device (the inverter) registration by following Connecting a Smart Device to EnOS Cloud. In this task, we will only create the model, product, and device for the gateway device.
Step 1: Create an Edge Device Model
Create an Edge device model called Edge_Model, with the assumption that there are no reusable edge device models.
In the EnOS Management Console, click Models from the left navigation menu.
Click New Model, and provide the following settings in the New Model window:
- Identifier: Edge_Model
- Model Name: Edge_Model
- Create From: No
- Source model: No
- Description: Edge Model

Click OK to complete the operation.
Click Edit, and click the Feature Definition tab in the Model Details screen.
Click Edit > Add > Create Custom Feature, and provide the following settings in the Add Feature window:
- Attribute
- Name: Version
- Identifier: Version
- Data Type: string
- String Length: 20
- Required: Yes
Click Confirm to complete the operation.
For more information about models, see Creating a Model.
Step 2: Create an Edge Product
Create a product called Edge_Product with the assumption that an edge device of this product model sends data in JSON format and the data transmission is not encrypted using the CA certificate.
- In the EnOS Management Console, select Device Management > Products.
- Click New Product, and provide the following settings in the New Product window:
- Product Name: Edge_Product
- Asset Type: Gateway
- Model: Edge_Product
- Data Type: Json
- Certificate-based Authentication: Disabled
- Description: Edge Product
- Click OK to complete the operation.
For more information about products, see Creating Products.
Step 3: Register the Edge Gateway
Create an edge device named Edge01, which belongs to the Edge_Product product model created in the previous step.
- In the EnOS Management Console, select Device Management > Device Assets.
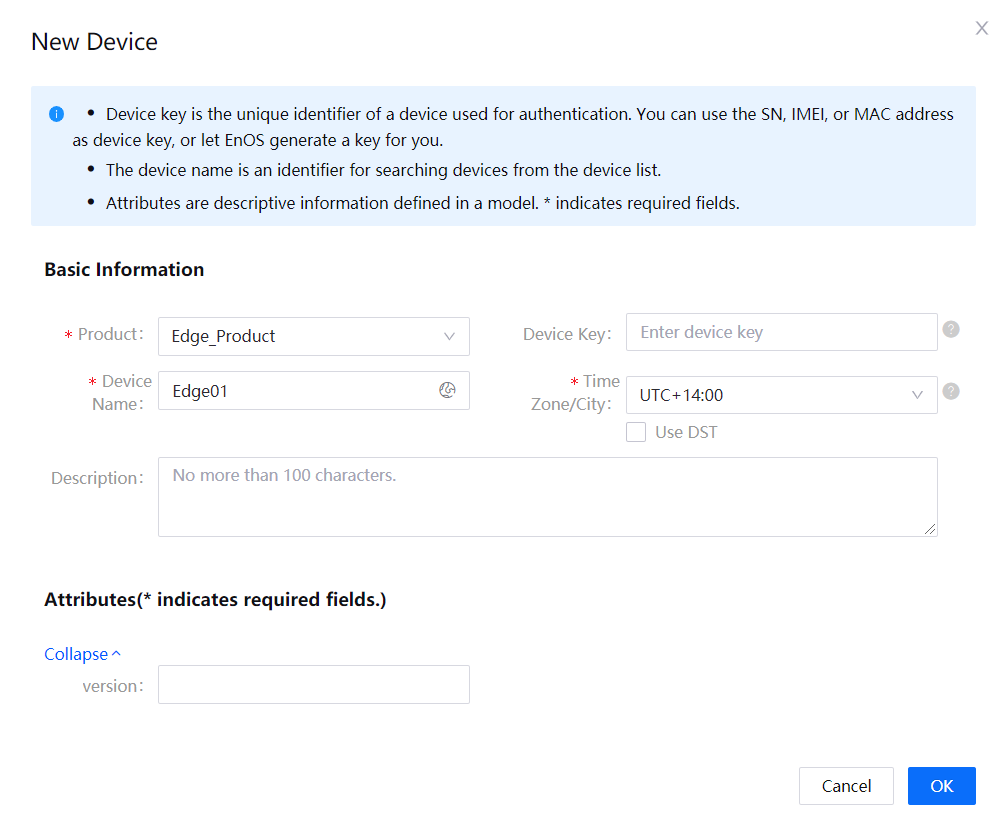
- Click New Device, and provide the following settings in the New Device window:
- Product: Edge_Product
- Device Name: Edge01
- Device Key: Optional, generated automatically by system
- timezone: UTC+14:00
- Use DST: Unchecked
- Version: Optional, left blank by default
- Click Confirm to complete the operation.
Step 4: Configure Edge Connection
Using EnOS Edge
Use this procedure if you choose to use the EnOS Edge. When you use the gateway products from other vendors, please refer to their respective gateway configuration instructions.
- Apply for an Edge gateway device from your Envision project manager or support representative. Your edge device triple needs to be burned into the edge firmware. Ensure that you get the edge device credentials ready. After the edge is prepared, you will obtain a serial number (SN) for the edge gateway.
- Go to the EnOS Edge > Edge Management configuration page, and activate the edge gateway device that you applied by entering the obtained SN.
- In the edge gateway, configure the connections and add sub-devices into the connection.
- Publish the configuration to the edge gateway.
For more information on how to configure the EnOS Edge gateway, see Adding an EnOS Edge Gateway.
Step 5: Use the Device SDK to Simulate the Sending of Data via the Gateway as a Proxy of the Sub-devices
Use the device SDK to simulate the sending of the active inverter power to the cloud.
Obtain the Device SDK. For more information, see the GitHub readme file.
Configure the EnOS Cloud connection as instructed in the readme file.
Configure the device triple (
ProductKey,DeviceKey, andDeviceSecret) into the sample connection program. The device triple is obtained when you register the device.Modify the
postSubMeasurepointmethod, and configure the name of the measurment point that sends telemetry to the cloud. In this example, we will send the active power point of the inverter, set the point name INV.GenActivePW, and the corresponding point value.Invoke the sample methods for the following operations:
Gateway log in: In the following sample code,
environment_addressis the address of the EnOS Cloud, and theproductKey,deviceKey, anddeviceSecretare the device triple of the edge gateway.public static void initWithCallback() { System.out.println("start connect with callback ... "); try { client = new MqttClient(environment_address, productKey, deviceKey, deviceSecret); client.getProfile().setConnectionTimeout(60).setAutoReconnect(false); client.connect(new ConnCallback() { public void connectComplete(boolean reconnect) { System.out.println("connect success"); } public void connectLost(Throwable cause) { System.out.println("onConnectLost"); } public void connectFailed(Throwable cause) { System.out.println("onConnectFailed : " + cause); } }); } catch (Throwable var1) { } System.out.println("connect result :" + client.isConnected()); }
The gateway adds the topology of sub-devices and the sub-device logs in through the edge gateway. In the following sample code, “
sub_pk”, “sub_dk”, and “sub_ds” are the device triple of the sub-device.public static void addTopo() throws Exception { System.out.println("start add topo ..."); TopoAddRequest request = (TopoAddRequest)TopoAddRequest.builder().addSubDevice(new SubDeviceInfo("sub_pk", "sub_dk", "sub_ds")).build(); TopoAddResponse rsp = (TopoAddResponse)client.publish(request); System.out.println("-->" + rsp); getTopo(); subDeviceLogin(); //Sub-device logs in through gateway }
The gateway sends the data of the sub-device as the proxy. The following sample code sends float data to the
INV.GenActivePWmeasurment point.public static void postSubMeasurepoint() { Random random = new Random(); System.out.println("start post sub device measurepoint ..."); MeasurepointPostRequest request = (MeasurepointPostRequest)((MeasurepointPostRequest.Builder)((MeasurepointPostRequest.Builder)MeasurepointPostRequest.builder().setProductKey("sub_pk")).setDeviceKey("sub_dk")).addMeasurePoint("INV.GenActivePW", random.nextFloat()).build(); try { MeasurepointPostResponse rsp = (MeasurepointPostResponse)client.publish(request); System.out.println("-->" + rsp); } catch (Exception var3) { var3.printStackTrace(); } }
For more information, see Using the Device SDK.
Step 6: Check the Device Status
In the EnOS Management Console, click Device Management > Device Assets, locate the Edge01 and INV001 devices and confirm that the devices are online.
Step 7: Check the Device Data
- From the device list, locate the device and click the View icon to show the Device Details page.
- Click the Measurment Points tab, select the INV.GenActivePW measurment point, and click the View Data icon to open the Data Insights page.
- View the latest data of the measurent point on the Data Insights page. If the TSDB storage policy has been configured for the measurement point, you can also view the historic data of the measurement point in a chart or table. For more information about data insights, see Generating Time Series Data Chart.