Synchronizing Data from External Data Source to Hive (Periodic Scheduling)
This section shows the steps on how to create an automatic data synchronization task that runs periodically from scratch.
Before You Start
Ensure that you have created the target Hive table to synchronize the data to. For more information, see Script Development.
Step 1: Create a Data Synchronization Task
In the EnOS Management Console, select Data Synchronization from the left navigation menu.
Click + above the task list or click New Synchronization Task in the blank page.
In the New Data Synchronization Task window, complete the basic settings for the task.
- Mode: Select New to create a task from scratch. If you wish to Import task config, go to Creating a Task by Importing an Existing Configuration.
- Name: Enter the name of the data synchronization task.
- Sync Type: Select Structured data.
- Scheduling Type: Select Periodic scheduling.
- Description: Provide a description for the data synchronization task.
- Select Dir: Select the directory to save the task.
Click OK to create the data synchronization task.
Step 2: Select the Data Source
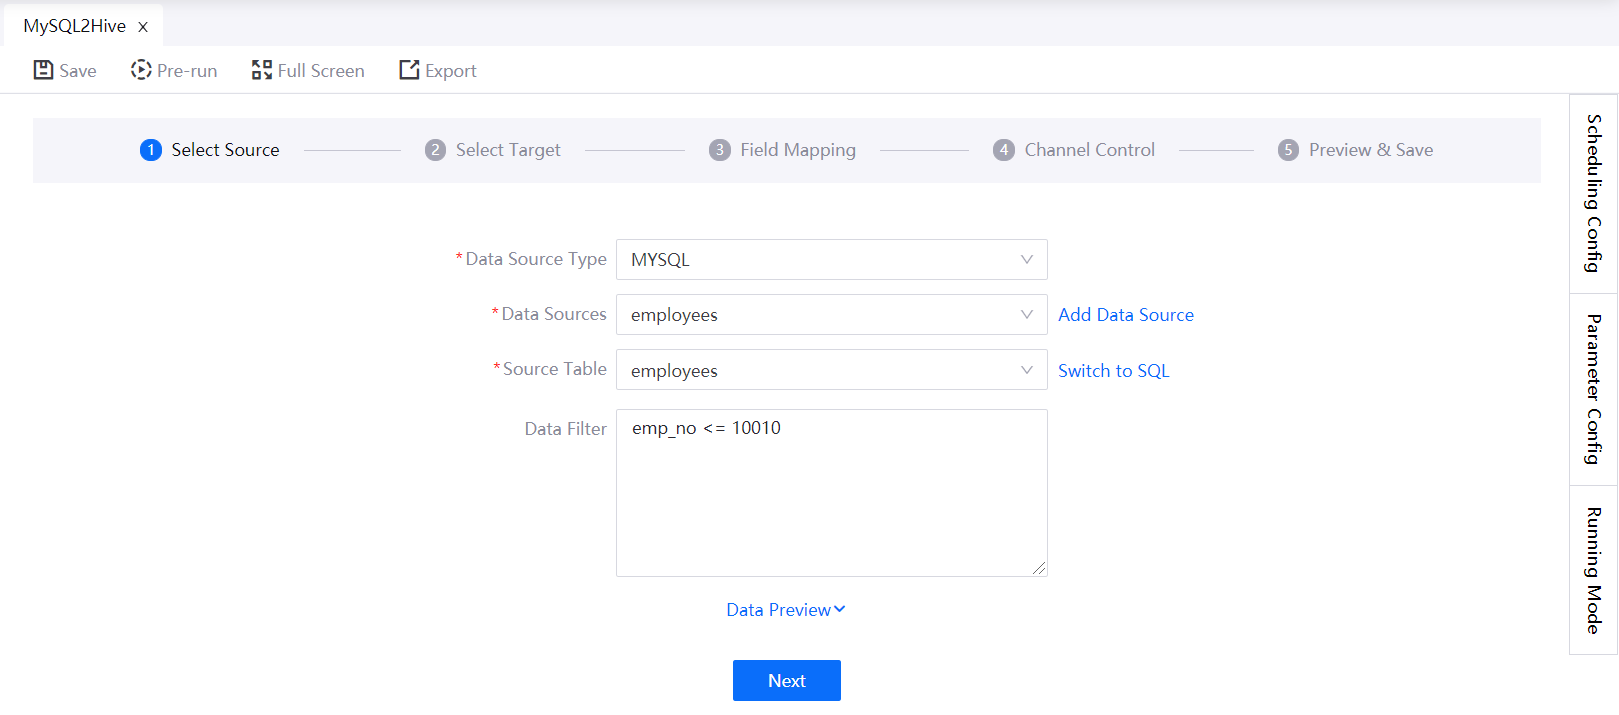
SQL Server, MySQL, or Oracle database
If you choose to synchronize data from an SQL Server, MySQL, or Oracle database, complete the following settings.
Data Sources: Select from the list of existing data sources or register a new data source. For more information, see Data Source Registration.
Source Table: Select the table to synchronize from the database.
Data Filter: If you want to filter the data to be synchronized, provide the SQL query script. Note that you do not need to enter
where. For example:emp_no <= 10010
(Optional) Click Data Preview. You can then preview the filtered data to synchronize as shown in the following figure.
Click Next.
Note
The time zone of MySQL database needs to be set as UTC, otherwise the tables in the MySQL database cannot be displayed normally.
Text-based data in BLOB, FTP, SFTP, or S3
If you choose to synchronize data from a BLOB, FTP, SFTP, or S3 data source, EnOS will transform the text-based data into a two-dimension table according to your settings.
Data Sources: Select from the list of existing data sources or add a new data source. For more information, see Data Source Registration.
Directory or File Name: Enter the directory or file to be synchronized. If the directory contains multiple files, the data records will be merged. In this case, ensure that all data in the same directory has the same columns.
Column Delimiter: Select the column delimiter that is used in the text-based data file, such as tab, comma, semicolon, space, or other delimiters.
Encoding: Select the encoding format of the data file: UTF-8, GBK, or GB2312.
Compression Format: Select the compression format of the data file (Uncompressed, LZO, BZIP2, or GZIP).
Mapping By: Select whether to mapping data by column number or by column name.
Number of Header Rows Ignored: Specify the number of header rows in the data file are to be ignored when loading the data.
Column Header: Specify the header names or upload header file for the source table. The specified headers will be used as the header names of the data source to be mapped with the header names in the target data source.
(Optional) Click Data Preview.

Click Next.
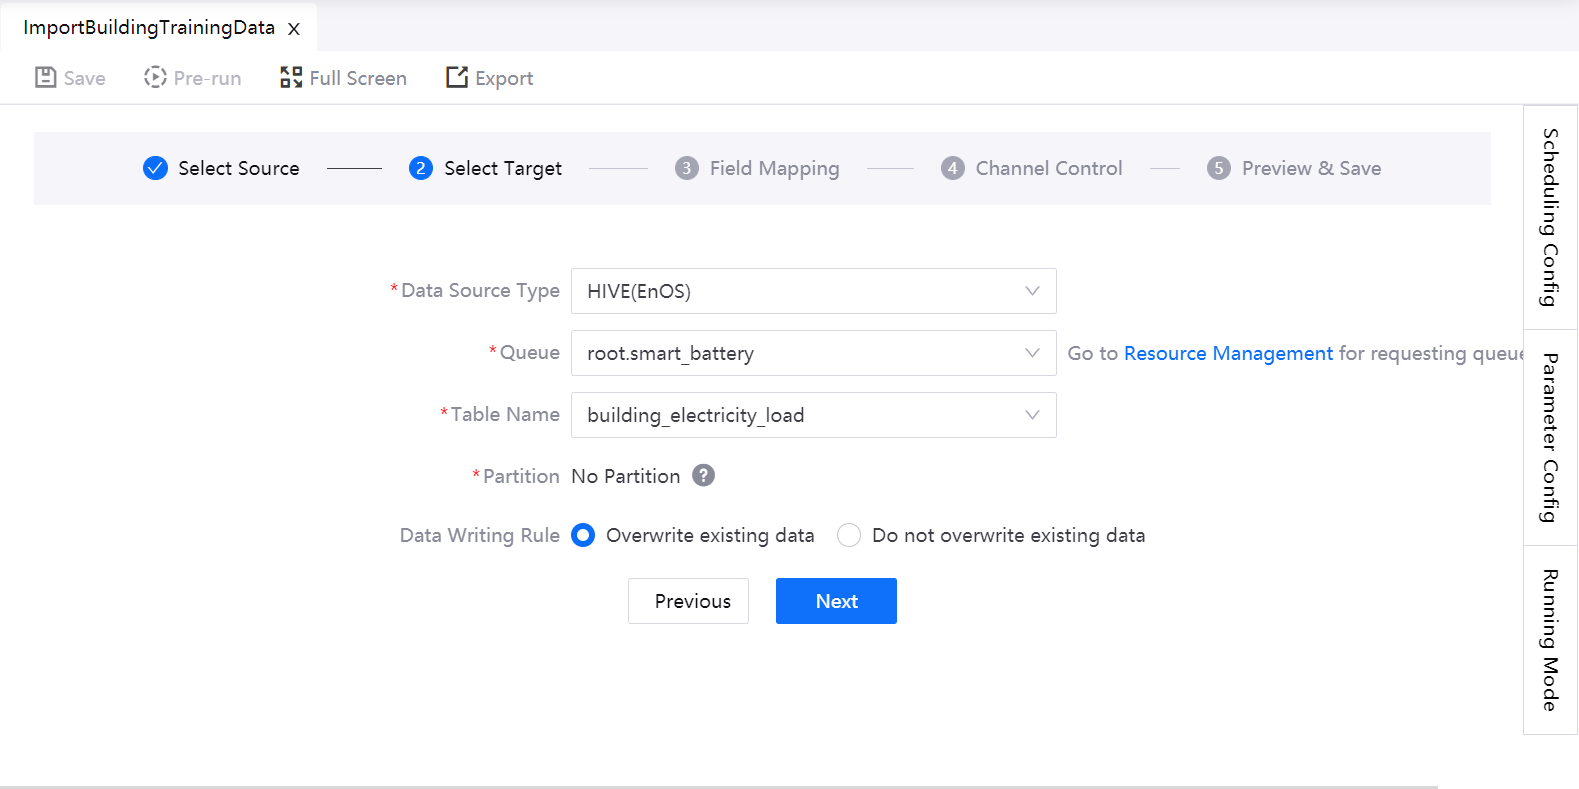
Step 3: Select the Target Table
For now, Hive is the only supported type. Complete the following settings for the target table.
Queue: Select the Batch Processing - Queue resource for running the data synchronization task (which can be requested through Resource Management).
Table Name: Select the target table.
If the Hive table is partitioned, the partitions are automatically loaded. Specify the target partition through the following methods.
- Column name: The system creates new partitions based on the values in this column (select the corresponding column name from the drop down list). If the column is date, for example, and the column values are
20180501and20180502, two partitions will be created. - Fixed value: If 2017-10-11 is entered for example, the data will be automatically synchronized to the
2017-10-11partition of the target table. - Placeholder: You can use system reserved or custom parameters, for example, the system variable
${cal_dt}. For more information about the usage of system variables, see Supported System Variables.
- Column name: The system creates new partitions based on the values in this column (select the corresponding column name from the drop down list). If the column is date, for example, and the column values are
Data Writing Rule: Specify whether to overwrite the existing data in the target table, or append the data behind the existing records.
Click Next.
Step 4: Configure Field Mapping Between Source and Target
In this step, the header names specified in the data source will be mapped with the header names in the target. You can also update the header mapping maually.
For each field in the Target Field column, click the source field from the Source Field column to map the source with the target.
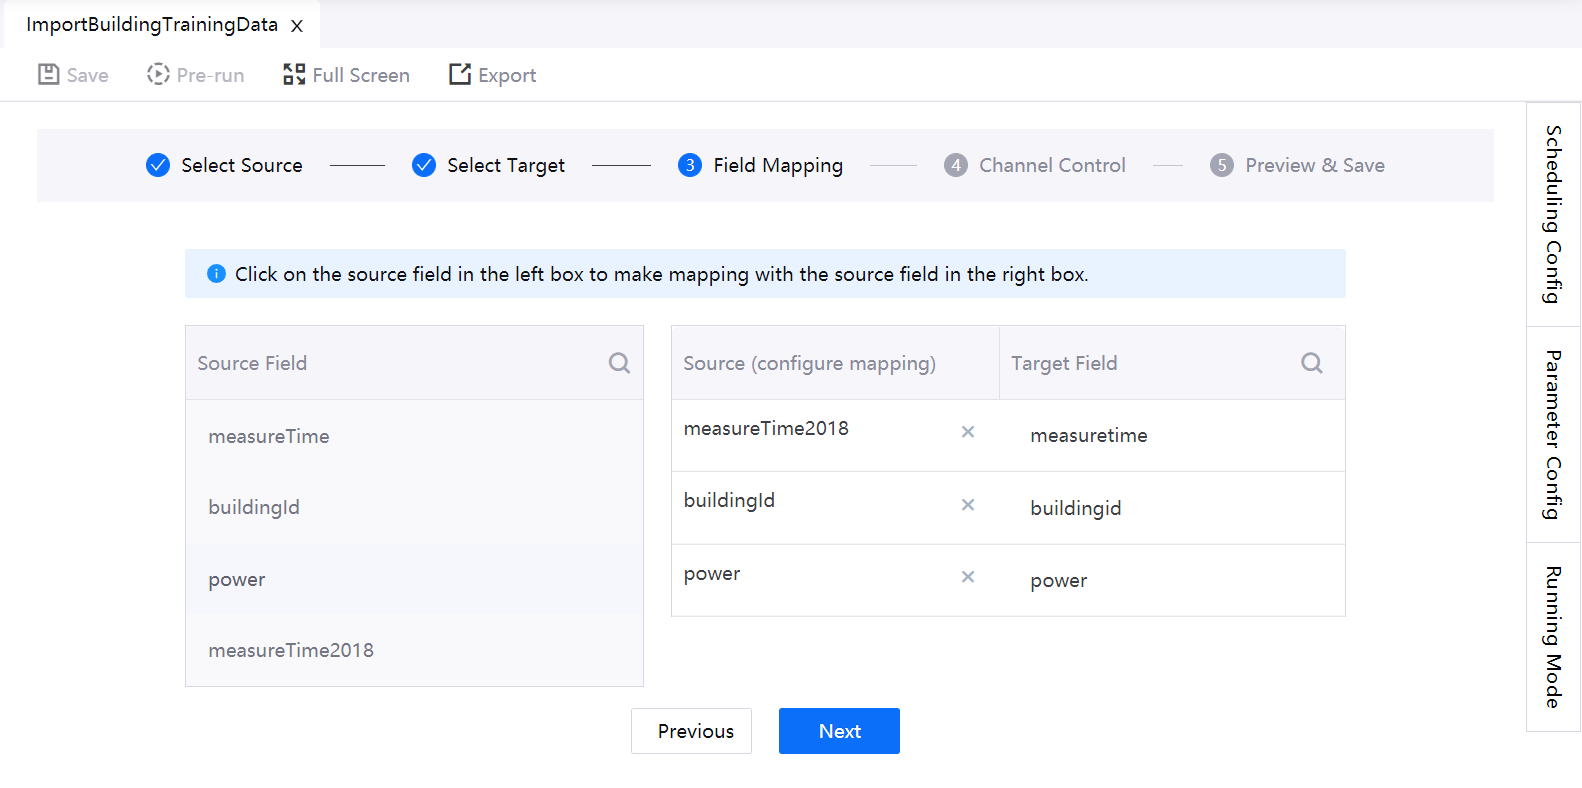
When you finish mapping all fields, click Next.
Step 5: Specify Scheduling Settings
- Click Scheduling Config at the right edge of the configuration panel.
- Complete the Basic Attribute settings:
- Task Name: If you want to change the task name, enter the new name.
- Owner: Select the task owner from the list of users in the organization who have access to the Data Synchronization service. The task creator is added by default. As the creator, you cannot delete yourself. You can add other owners in the same organization.
- Description: (Optional) Provide a description.
- Alert Mode: Select how to alert the task owner. Email is selected by default, and cannot be unselected.
- Email: an alert e-mail is sent to the owner when an instance meets the alert conditions.
- SMS: To use this feature, the user’s phone number must be verified during user registration. Note that the SMS alert is sent only to the task owner when an instance meets the alert conditions.
- Complete the Scheduling Attribute settings:
- Effective Date: Specify when the task will start to take effect.
- Scheduling Cycle: Specify how frequent to run the task. For example, you can specify to run the task on a daily basis. You can also select to use the CronTab expression.
- Specific Time: Based the cycle you select, specify the exact time in a cycle to run the task. For example, you can specify to run the task at 9:00 am everyday. If you chose the CronTab syntax, enter the 7-character CronTab expression. For example, the value
59 59 23 * * ? *indicates that the task is to run at 23:59:59 every day. For more information about CronTab, see the Cron Expression Explainer. - Scheduling Status: Specify the status of the task.
- Timeout: Specify the timeout value.
- Retry Times: Specify the number of reconnection attempts to try after timeout. The task will fail after all the retry attempts are used up.
- Retry Interval: Specify the interval between each reconnection attempt.
- Allow Reference: Select whether this task can be referenced by another task.
Step 6: Specify Parameters
If parameters are used when you configure the data source and target, you need to specify their values. You can specify constants, system variables, or custom variables for a parameter.
Click Parameter Config at the right edge of the configuration panel.
Provide the value for each parameter that is used. For example, you may use a parameter when you set the URL to your S3 data source, where
test_listis a parameter:s3://history/log_solar_dt_change_inverter/${test_list}.each_valueYou can then assign values for the parameter as per the below.
test_list=Array[20170515,20170516,20170517,20170518,20170519,20170520]This setting will make EnOS synchronize all data from the directories as per specified by the parameter values.
You can assign system variables as parameter values. For more information, see Supported System Variables.
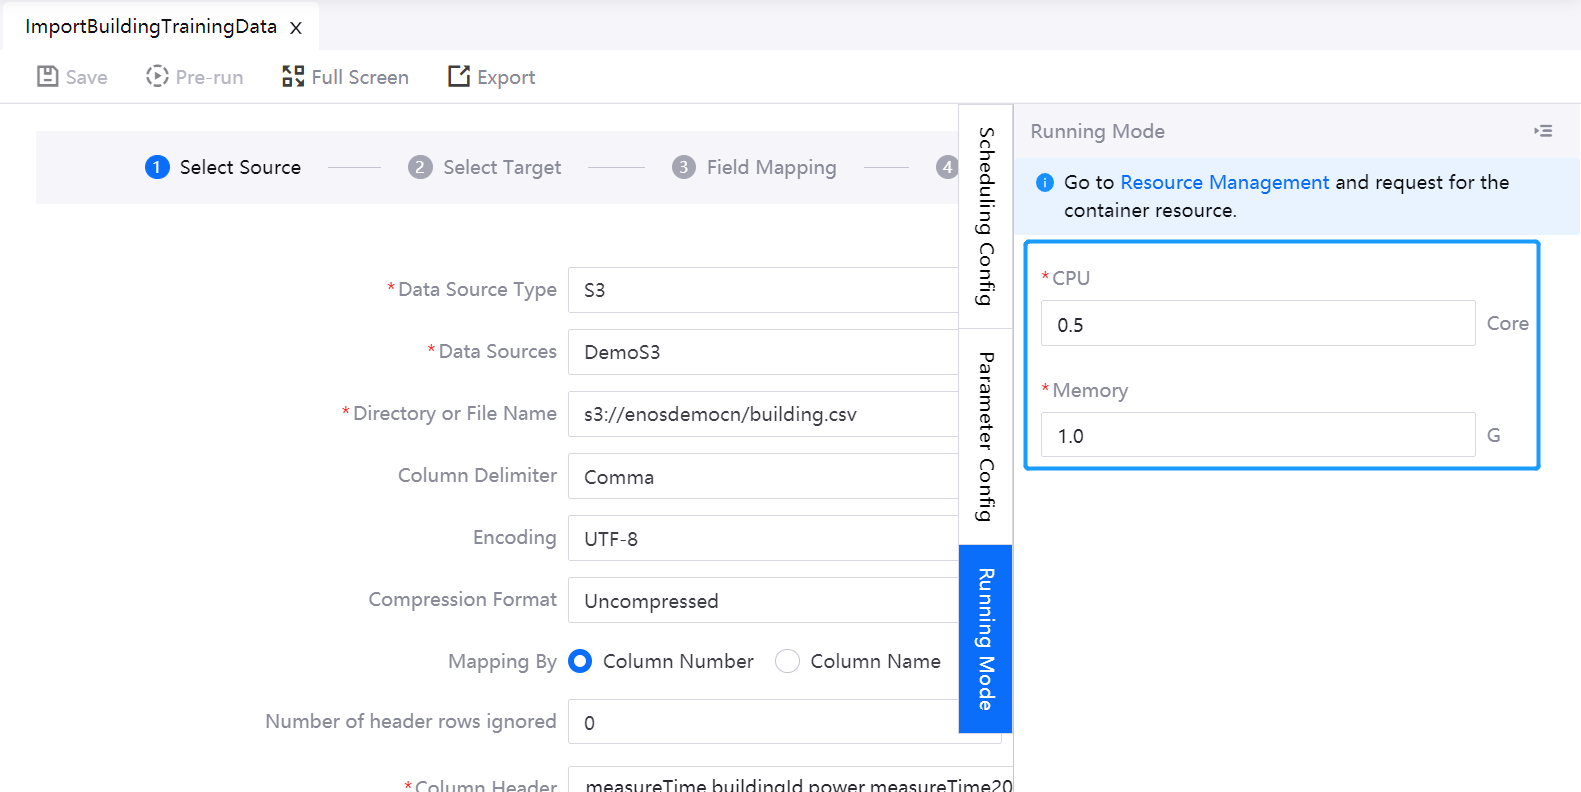
Step 7: Configure Running Mode
Configure the container resources that are required for running the data synchronization task by the following steps:
Click Running Mode at the right edge of the configuration panel.
Enter the CPU and memory for running the data synchronization task
If your OU has not requested for the Batch Processing - Container resource, click the Resource Management link and request for the needed resources.
Step 8: Configure Concurrency
Select the number of concurrent connections to establish and click Next.
The higher the concurrency number, the larger load the database will have. When the total transmission rate is fixed, the rate of a single concurrent connection is smaller.
Step 9: Preview and Save the Configuration
You can preview the settings of the data synchronization task, and click the Previous button to make changes if needed. Click Done to save the configuration.
Next Step
Click Pre-run and select a triggering time to test running the data synchronization task.
After a task starts to run, an instance will be generated. You can then trace the details about the instance through Workflow Operation. For more information, see Workflow Operation.
After the data is synchronized from the data source, you can schedule other processing tasks based on the data. For more information, see Batch Processing Overview.