Manage Notebook Instances
The MI Lab integrates Jupyter Notebook to provide a model development and researching environment for data scientists. After entering the MI Lab, you can perform the following management operations on the notebook instances:
- View notebook instances
- Create a notebook instance
- Delete notebook instances
- Open a notebook instance and enter the JupyterLab experiment environment
Prerequisites
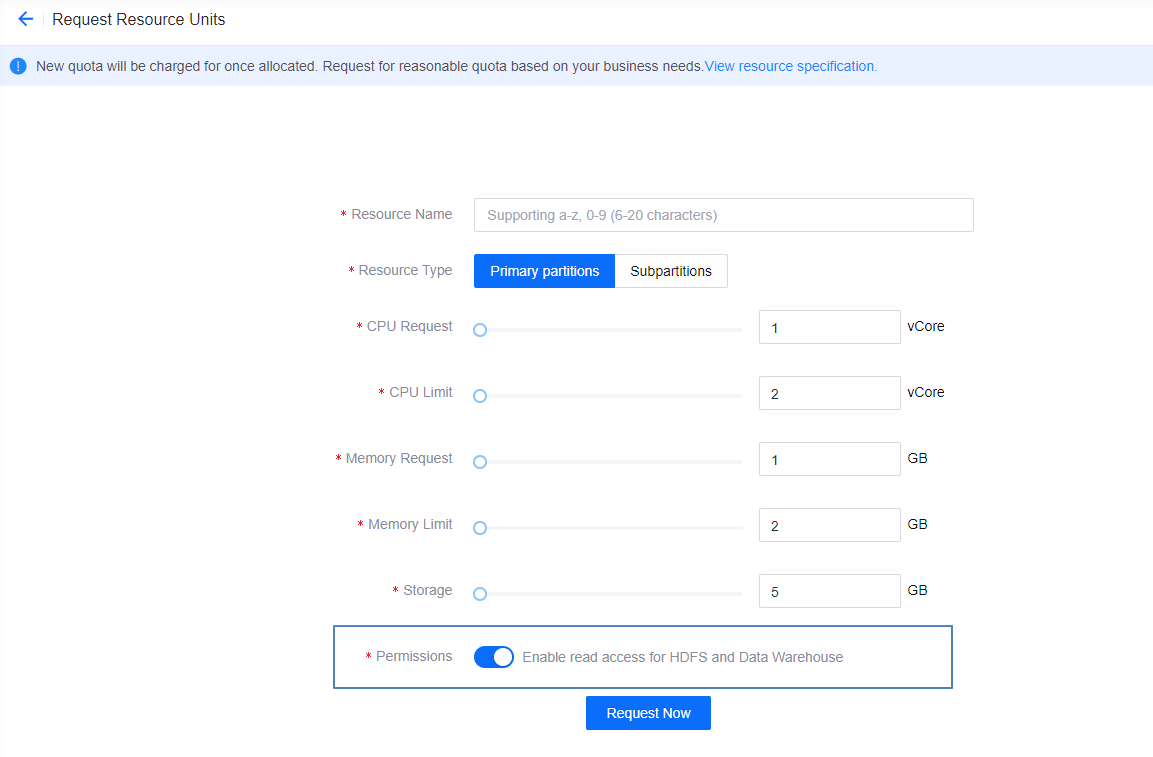
- The organization has requested the ML Model - Container resource required by the notebook instance (resource pool) through the EnOS Management Console > Resource Management page.
- You have added the workspace storage and data storage required by the notebook instance through the Resource Config > Storage Config page.
Create a Notebook Instance
The MI Lab notebook instance supports different types of resource pools (resource pools that enable or disable the data read access for HDFS and Data Warehouse). When creating a notebook instance, you can select different types of resource pools according to business needs.
Data Read Access Disabled for HDFS and Data Warehouse
You can create a notebook instance (without using HDFS and Data Warehouse) by following these steps:
Log in to the EnOS Management Console, and select Enterprise Analytics Platform > Machine Intelligence Studio > MI Lab from the left navigation bar to open the Notebook homepage.
Click New Instance to complete the basic information, image, and required resource configuration of the notebook instance:
- Instance Name: Enter the name of the notebook instance.
- Resource Pool: Select the resource pool that has been requested in Resource Management to run the notebook instance.
- Image: Select the image to be used by the notebook instance or enter the image path manually. The built-in images supports the following framework types:
- MXNet
- Keras
- PyTorch
- XGBoost
- LightGBM
- TensorFlow
- PySpark
- Spark
- R
- CPU/Memory: If needed, change the CPU and memory request/limit that are required for running the notebook instance. Note that the total requests and limits in EAP cannot exceed the requests and limits of the resource pool.
- Workspace Storage: Select the storage corresponding to the resource pool as the workspace storage required for the notebook instance to run.
- You can click the refresh icon to show the newly created PVC storage; you can optionally disable workspace storage, but code or files that are saved in the Notebook will be lost when the Notebook is restarted.
- You can click Add item in the drop down list to quickly add the needed workspace storage.
- Data Storage: Select the storage corresponding to the resource pool to store experimental data and specify the data mount point.
- You can click the refresh icon to show the newly created PVC storage.
- You can click Add item in the drop down list to quickly add the needed data storage.
- If GPUs are available, you can choose whether to use GPUs.
Click Confirm. After the notebook instance is created, it will start running.

Data Read Access Enabled for HDFS and Data Warehouse
Prerequisites:
You should ensure that the organization has request the ML Model - Container resource through the Resource Management page, and the data read access for HDFS and Data Warehouses is enabled for the requested resources. As shown below:
You have used the requested resource pool to add the workspace storage and data storage required by the notebook instance through the Resource Configuration > Storage Configuration page. As shown below:

You can then create a notebook instance (with data read access enabled for HDFS and Data Warehouse) by following these steps:
Log in to the EnOS Management Console, and select Enterprise Analytics Platform > Machine Intelligence Studio > MI Lab from the left navigation bar to open the Notebook homepage.
Click New Instance to complete the basic information, mirroring, and required resource configuration of the notebook instance:
- Instance Name: Enter the name of the notebook instance.
- Resource Pool: Select the resource pool that has been requested in Resource Management to run the notebook instance.
- Image: Select the image to be used by the notebook instance (where only pyspark or spark images can be selected) or enter the image path manually.
- CPU/Memory: If needed, change the CPU and memory request/limit that are required for running the notebook instance. Note that the total requests and limits in EAP cannot exceed the requests and limits of the resource pool.
- Workspace Storage: Select the storage corresponding to the resource pool as the workspace storage required for the notebook instance to run.
- You can click the refresh icon to show the newly created PVC storage; you can optionally disable workspace storage, but code or files that are saved in the Notebook will be lost when the Notebook is restarted.
- You can click Add item in the drop down list to quickly add the needed workspace storage.
- Data Storage: Check Mode Hadoop PVC to enable data read access for HDFS and Data Warehouse, and add storage for saving the experiment data.
- (Optional) Use other keytab file: Upload a customized keytab file if needed (ensure that the file name must not be in
data_ouid.keytabformat). - If GPUs are available, you can choose whether to use GPUs.


Click Confirm. After the notebook instance is created, it will start running.
Open the Notebook Instance and Access JupyterLab
After the notebook instance starts running, click the notebook instance name or click Open in the Notebook Instance details page to access the JupyterLab environment and start data exploration and development.

For more information about how to use JupyterLab for data exploration and development, see JupyterLab Documentation.
Edit Notebook Instance
In the notebook instance list, click the View icon ![]() to view the Notebook Instance details, you can also click Edit in the upper right corner to edit the following information of the instance:
to view the Notebook Instance details, you can also click Edit in the upper right corner to edit the following information of the instance:
- The image to be used by the notebook instance
- The CPU and memory that are required for running the notebook instance
- Add data storage space
- Set whether to mount Hadoop PVC (when data read permission is enabled for HDFS and Data Warehouse)
Delete Notebook Instance
When the notebook instance is no longer needed after the model experiment development is completed, you can select the notebook instance in the notebook instance list and click Delete to delete the notebook instance and release appropriate resources.
Note
Before deleting the notebook instance, you need to ensure that the files stored in the notebook are allowed to be deleted, and any deleted files cannot be restored. Please operate with caution.